前言 在《详解React Native初始化和通信机制》 中我们详细的介绍了React Native的初始化和通信机制。如果对通信机制不了的的读者可以先去阅读通信机制。
React Native 本质上是以 React 为框架,笔者的理解是React Native通过JS(React)实现业务逻辑;通过Native实现视图。所以最终开发出来的页面视图是是纯Native组件。本文会通过源码分析的方式剖析React Native中视图的创建、更新、渲染原理。
JSX JSX是一个 JavaScript 的语法扩展,可以简单理解为 JavaScript + XML 的语法糖。React虽然不强制要求使用JSX,但官方建议使用,因为JSX可以很好地描述 UI 应该呈现出它应有交互的本质形式。JSX 可能会使人联想到模版语言,但它具有 JavaScript 的全部功能。如下就是一个JSX语句:
1 const element = <h1>Hello, world!</h1>;
由于JSX是一种语法糖,所以在bundle打包过程中,以上的JSX语法会被Babel转换成普通JS语句,如下:
1 const element = React.createElement("h1", null, "Hello, world!");
可以通过babel compiler 体验在线JSX转换。
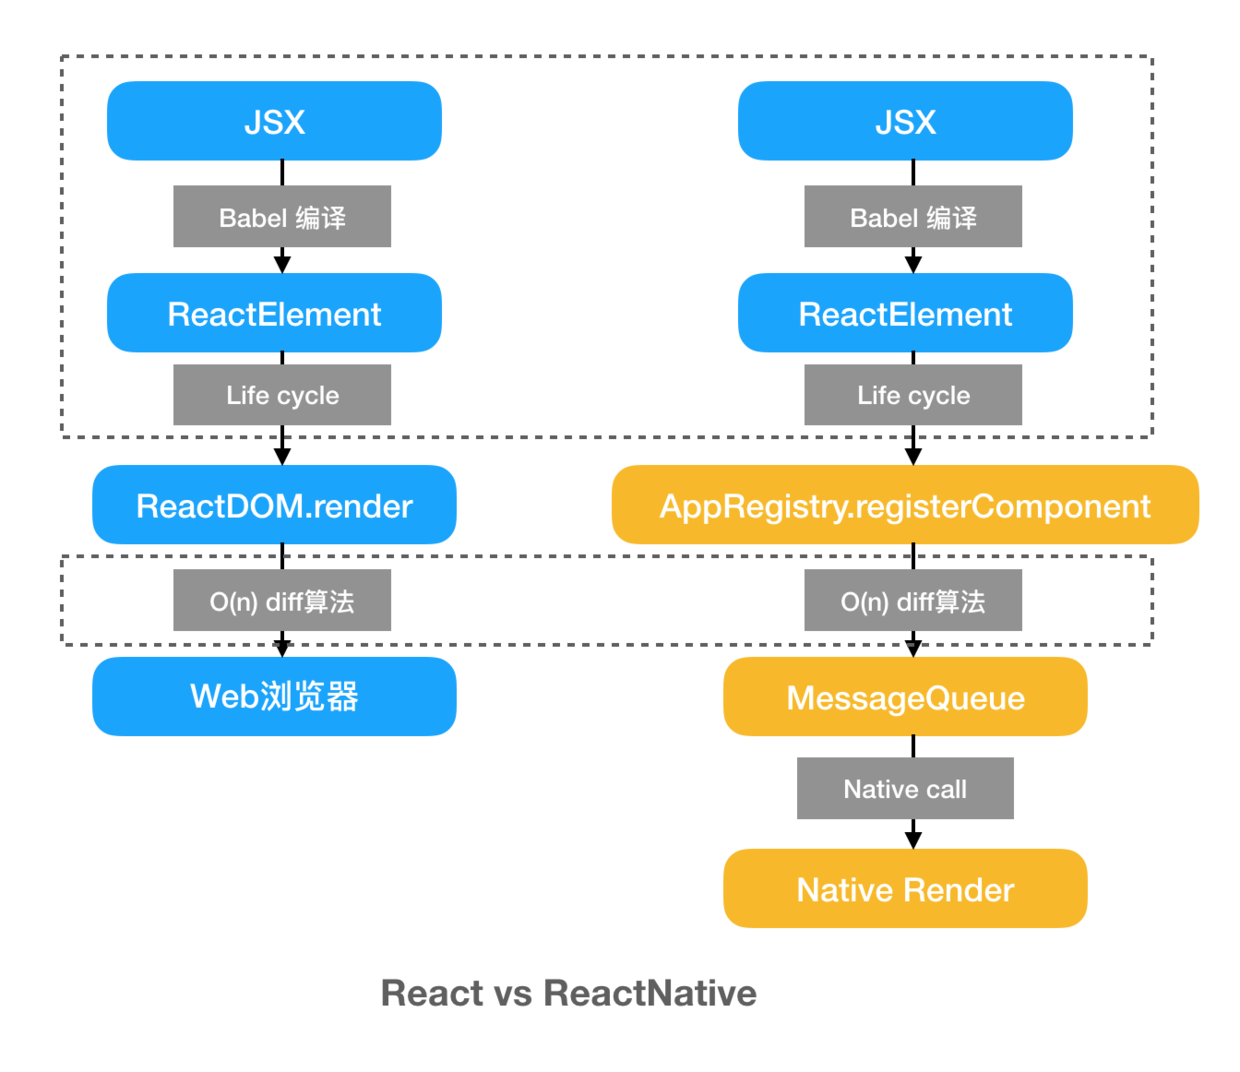
React vs ReactNative
如上图,参考自这篇文章 。上图呈现了React和ReactNative的大致渲染过程。如果你了解React.js 的渲染过程,那么去理解ReactNative就很容易。蓝色是React具备的能力,黄色是ReactNative特有的能力。虚线框里面的是React和ReactNative通用的部分。不同的是Render,ReactNative的View不是浏览器渲染的,而是Native侧渲染的view。所以ReactNative 可以理解是 React.js 在Native上的一种翻译,为了完成这种React到Native语法的解释,native侧也就必须具备解释这些渲染语法的能力,常见的就是yoga。 因为那个O(n)复杂度的Diff算法是基于 Virtual DOM, 也就是ReactElement在内存中的一种组织形式,所以这一部分也被利用在了ReactNative上。综上,不难看出ReactNative和React的最大的差别在于渲染上的差别。即React使用浏览器进行渲染,而ReactNative使用Native进行渲染。
在上一篇文章中我们说到,JS代码加载完毕后会发送一个通知给RCTRootView。RCTRootView会执行runApplication相关的逻辑:
1
2
3
4
5
6
7
8
9
10
11
12
13
14
15
16
17
18
19
20
21
22
23
24
25
26
27
28
29
30
31
32
33
// RCTRootView.m - (void)javaScriptDidLoad:(NSNotification *)notification { RCTAssertMainQueue(); RCTBridge *bridge = notification.userInfo[@"bridge"]; if (bridge != _contentView.bridge) { [self bundleFinishedLoading:bridge]; } } - (void)bundleFinishedLoading:(RCTBridge *)bridge { // 省略创建RCTRootContentView... [self runApplication:bridge]; // 省略添加一个RCTRootContentView... } - (void)runApplication:(RCTBridge *)bridge { NSString *moduleName = _moduleName ?: @""; // 这里是@"NewProject" NSDictionary *appParameters = @{ @"rootTag": _contentView.reactTag, @"initialProps": _appProperties ?: @{}, }; [bridge enqueueJSCall:@"AppRegistry" method:@"runApplication" args:@[moduleName, appParameters] completion:NULL]; }
RCTRootView的runApplication:方法以_moduleName、_contentView.reactTag以及_appProperties为参数调用 JS 侧AppRegistry的runApplication方法。
说到AppRegistry,我们不得不跳到JS侧
在 RN 中,根组件(root components)需要通过AppRegistry的registerComponent方法进行注册。所谓根组件,就是 Native to JS 的入口,Native 在加载 RN bundle 之后可通过AppRegistry的runApplication方法运行指定的根组件,从而进入 RN 的世界。
AppRegistry 注册根组件
1
2
3
4
5
6
7
8
9
10
11
12
13
14
15
16
17
18
19
20
21
22
23
24
25
26
27
28
29
30
31
32
33
34
35
36
37
38
39
40
41
42
43
44
45
46
47
48
49
50
// index.js import {AppRegistry} from 'react-native'; import App from './App'; import {name as appName} from './app.json'; // 此处appName需要和Native侧的保持一致,即“NewProject” AppRegistry.registerComponent(appName, () => App); /************************************************************************/ // 路径:react-native/Libraries/ReactNative/AppRegistry.js // 代码有精简... const AppRegistry = { registerComponent( appKey: string, componentProvider: ComponentProvider, section?: boolean, ): string { let scopedPerformanceLogger = createPerformanceLogger(); // 以appKey为key注册一个名为run的箭头函数 runnables[appKey] = { componentProvider, run: appParameters => { // run本质上是调用的renderApplication函数 renderApplication( componentProviderInstrumentationHook( componentProvider, scopedPerformanceLogger, ), appParameters.initialProps, appParameters.rootTag, wrapperComponentProvider && wrapperComponentProvider(appParameters), appParameters.fabric, showFabricIndicator, scopedPerformanceLogger, ); }, }; if (section) { sections[appKey] = runnables[appKey]; } return appKey; }, runApplication(appKey: string, appParameters: any): void { // 代码有精简... runnables[appKey].run(appParameters); } }
如上,不难看出AppRegistry是一个常量,以key-value的形式存储了若干个函数,包括registerComponent和runApplication。registerComponent中以appKey(此文中是”NewProject”)为key向注册表runnables中存储了一个对象。该对象主要包括以run为 key 存储的箭头函数,run中调用了renderApplication方法。所以在Native侧的RCTRootView中调用AppRegistry的runApplication最终会调用到renderApplication。
注意:定义根组件时调用AppRegistry.registerComponent方法的 key 与在RCTRootViewrunApplication:中调用AppRegistry#runApplication时的 key 需要一致(在例子中都是NewProject)。只有appKey保持一致,JS#runApplication才能从注册表runnables中取出箭头函数执行渲染逻辑。
上面说到runApplication最终调用renderApplication,让我们再来看下renderApplication的实现:
1
2
3
4
5
6
7
8
9
10
11
12
13
14
15
16
17
18
19
20
21
22
23
24
25
26
27
28
29
30
31
32
33
34
// 路径:react-native/Libraries/ReactNative/renderApplication.js function renderApplication<Props: Object>( RootComponent: React.ComponentType<Props>, initialProps: Props, rootTag: any, WrapperComponent?: ?React.ComponentType<*>, fabric?: boolean, showFabricIndicator?: boolean, scopedPerformanceLogger?: IPerformanceLogger, ) { const renderable = ( <PerformanceLoggerContext.Provider value={scopedPerformanceLogger ?? GlobalPerformanceLogger}> <AppContainer rootTag={rootTag} WrapperComponent={WrapperComponent}> <RootComponent {...initialProps} rootTag={rootTag} /> {fabric === true && showFabricIndicator === true ? ( <ReactFabricIndicator /> ) : null} </AppContainer> </PerformanceLoggerContext.Provider> ); GlobalPerformanceLogger.startTimespan('renderApplication_React_render'); if (fabric) { require('../Renderer/shims/ReactFabric').render(renderable, rootTag); } else { require('../Renderer/shims/ReactNative').render(renderable, rootTag); } GlobalPerformanceLogger.stopTimespan('renderApplication_React_render'); } module.exports = renderApplication;
不难看出,renderApplication最终是调用了ReactFabric或ReactNative的render方法。
注意:值得注意的是,ReactFabric或ReactNative的render的方法并不是直接渲染我们传入的RootComponent,而是在其外面包了一层——AppContainer。
AppContainer是一个 React Component,其中封装了Inspector、YellowBox等debug工具。我们最不愿看到的出错时的红色界面也是在该组件中加载的。
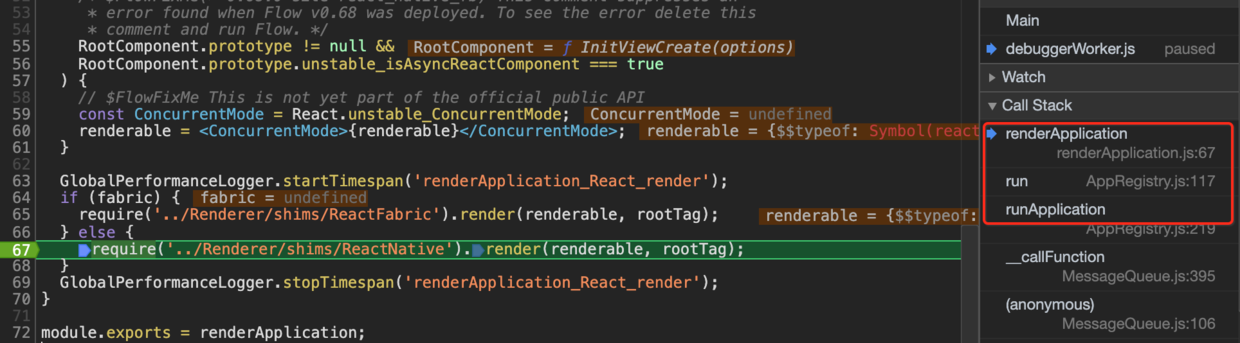
下图是renderApplication函数的调用堆栈:
上述使用chrome远程调试的debug环境下调用到了ReactNative#render方法,我们看下ReactNative的render实现:
1
2
3
4
5
6
7
8
9
10
11
12
13
// 路径:react-native/Libraries/Renderer/shims/ReactNative.js import type {ReactNativeType} from './ReactNativeTypes'; let ReactNative; if (__DEV__) { ReactNative = require('../implementations/ReactNativeRenderer-dev'); } else { ReactNative = require('../implementations/ReactNativeRenderer-prod'); } module.exports = (ReactNative: ReactNativeType)
我们看下在dev环境下的render的实现:
1
2
3
4
5
6
7
8
9
10
11
12
13
14
// 路径:react-native/Libraries/Renderer/implementations/ReactNativeRenderer-dev.js render: function(element, containerTag, callback) { var root = roots.get(containerTag); if (!root) { // TODO (bvaughn): If we decide to keep the wrapper component, // We could create a wrapper for containerTag as well to reduce special casing. root = createContainer(containerTag, LegacyRoot, false); roots.set(containerTag, root); } updateContainer(element, root, null, callback); return getPublicRootInstance(root); },
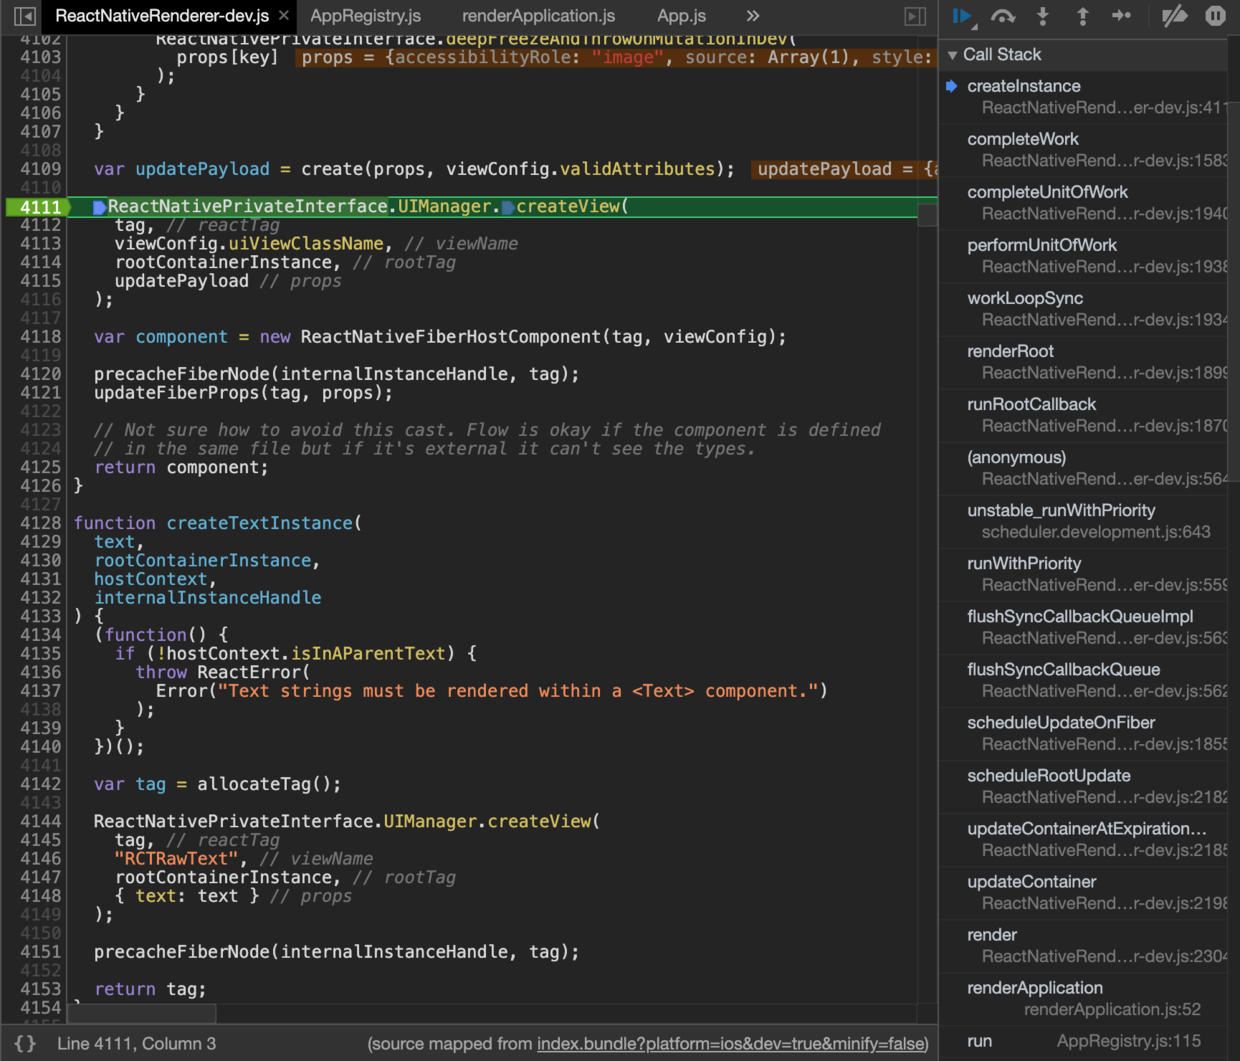
然后经由render调用updateContainer方法,最后经过一系列方法的调用,最终调用到了ReactNativeRenderer-dev
的createInstance,然后createInstance内部调用了UIManager.createView,其调用栈如下:
通过下面调用栈可以看出,dev环境下render之后直到调用createView之前所有的方法调用都发生在ReactNativeRenderer-dev中。prod环境同理。
createView顾名思义就是创建一个真正的view,既然要创建视图,那么肯定是由native侧来实现的。createView把接收4个参数,分别是reactTag、rootTag、viewName、props。下面是native侧对createView的实现:
1
2
3
4
5
6
7
8
9
10
11
12
13
14
15
16
17
18
19
20
21
22
23
24
25
26
27
28
29
30
31
32
33
34
35
36
37
38
39
40
41
42
43
44
45
46
47
48
49
50
51
52
53
54
55
// RCTUIManager.m // 代码有精简 RCT_EXPORT_METHOD(createView:(nonnull NSNumber *)reactTag viewName:(NSString *)viewName rootTag:(nonnull NSNumber *)rootTag props:(NSDictionary *)props) { RCTComponentData *componentData = _componentDataByName[viewName]; // Register shadow view RCTShadowView *shadowView = [componentData createShadowViewWithTag:reactTag]; if (shadowView) { [componentData setProps:props forShadowView:shadowView]; _shadowViewRegistry[reactTag] = shadowView; RCTShadowView *rootView = _shadowViewRegistry[rootTag]; shadowView.rootView = (RCTRootShadowView *)rootView; } // Dispatch view creation directly to the main thread instead of adding to // UIBlocks array. This way, it doesn't get deferred until after layout. __block UIView *preliminaryCreatedView = nil; void (^createViewBlock)(void) = ^{ // Do nothing on the second run. if (preliminaryCreatedView) { return; } // 创建一个view preliminaryCreatedView = [componentData createViewWithTag:reactTag]; // 将创建的view缓存在_viewRegistry中 if (preliminaryCreatedView) { self->_viewRegistry[reactTag] = preliminaryCreatedView; } }; // We cannot guarantee that asynchronously scheduled block will be executed // *before* a block is added to the regular mounting process (simply because // mounting process can be managed externally while the main queue is // locked). // So, we positively dispatch it asynchronously and double check inside // the regular mounting block. RCTExecuteOnMainQueue(createViewBlock); [self addUIBlock:^(__unused RCTUIManager *uiManager, __unused NSDictionary<NSNumber *, UIView *> *viewRegistry) { createViewBlock(); if (preliminaryCreatedView) { [componentData setProps:props forView:preliminaryCreatedView]; } }]; [self _shadowView:shadowView didReceiveUpdatedProps:[props allKeys]]; }
上面createView方法涉及到2个类:RCTComponentData、RCTShadowView。此时我们有必要介绍一下这两个类的作用以及和他们相关的一些类。
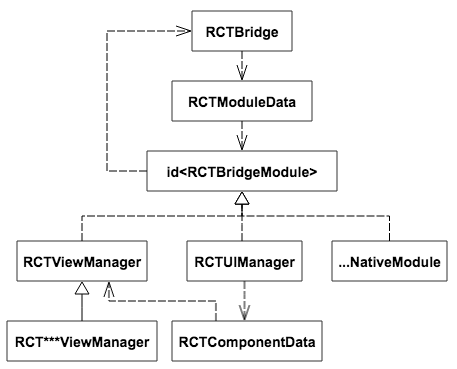
RCTComponentData 在说RCTComponentData之前,我们有必要先说一下他和其他类的关系,如下图:
上图取材于这篇文章 。通过上面类图可以看出,RCTBridge依赖了RCTModuleData。RCTModuleData依赖(实现)了RCTBridgeModule协议。RCTViewManager、RCTUIManager、NativeModule都实现了RCTBridgeModule协议。且RCTViewManager、RCTUIManager、NativeModule都依赖了RCTBridge。
RCTViewManager:负责管理ReactNative在native侧的view,包括RCTImageView、RCTTextView、RCTBaseTextInputView等。我们native侧封装的用于暴露给JS侧使用的原生视图组件也需要视同RCTViewManager来管理。通常需要自定义一个类继承自RCTViewManager。如下所示:
1
2
3
4
5
6
7
8
9
10
11
12
13
14
15
16
17
18
19
20
21
22
23
24
25
26
27
28
29
30
31
32
// RichTextLabelManager.h #import <React/RCTViewManager.h> @interface RichTextLabelManager : RCTViewManager @end // RichTextLabelManager.m #import "RichTextLabelManager.h" #import "RichTextLabel.h" @implementation RichTextLabelManager RCT_EXPORT_MODULE() RCT_EXPORT_VIEW_PROPERTY(richText, NSString) - (dispatch_queue_t)methodQueue { return dispatch_get_main_queue(); } - (UIView *)view { RichTextLabel *label = [[RichTextLabel alloc] init]; label.contentMode = UIViewContentModeRedraw; return label; } @end
RCTViewManager实现了RCTBridgeModule协议。该协议规定了一些宏和方法,包括常见的RCT_EXPORT_MODULE宏。因为RCTViewManager实现了协议方法,所以通过RCTViewManager及其子类,我们可以按照ReactNative的接口规范将native view暴露给JS。所以,我们在将native view暴露给JS侧使用的时候,通常是自定义一个RCTViewManager子类,然后实现RCTBridgeModule协议的方法。
RCTUIManager:在 JS to Native 的渲染流程中,RCTUIManager起到重要作用:包括 Native View 的创建、布局、移除等操作都是通过RCTUIManager完成的。给RCTUIManager设置bridge的过程中,RCTUIManager会根据RCTViewManager生成一个与之对应的RCTComponentData对象。
下面是RCTUIManager的setBridge:方法实现:
通过RCTUIManager#setBridge:方法实现可知:所有的RCTViewManager都会以RCTComponentData格式储存在RCTUIManager->_componentDataByName中。
1
2
3
4
5
6
7
8
9
10
11
12
13
14
15
16
17
18
19
// RCTUIManager.m - (void)setBridge:(RCTBridge *)bridge { _bridge = bridge; // 省略若干行代码... // 从_bridge获取view managers _componentDataByName = [NSMutableDictionary new]; for (Class moduleClass in _bridge.moduleClasses) { if ([moduleClass isSubclassOfClass:[RCTViewManager class]]) { RCTComponentData *componentData = [[RCTComponentData alloc] initWithManagerClass:moduleClass bridge:_bridge]; _componentDataByName[componentData.name] = componentData; } } // 省略若干行代码... }
RCTUIManager通过RCTComponentData操作RCTViewManager,包括创建组件(createView)、更新组件属性(updateView)等,具体内容后文会详细介绍。
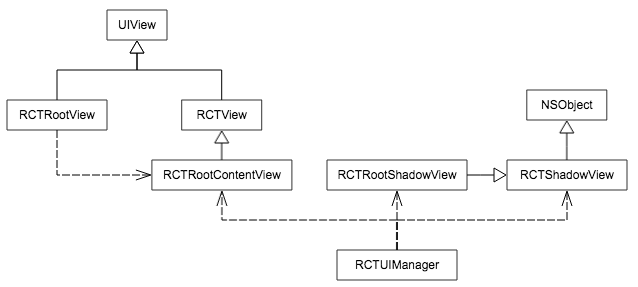
RCTRootView 再说RCShadowView之前,需要先了解下“真正的”view,RCTView、RCTRootView等。先看一下与之相关的类图:
上图取材于这篇文章 。如上图所示,RCTRootViewView和RCTView都继承自UIView。RCTRootContentView继承自RCTView。RCTRootView持有一个RCTRootContentView。
RCTShadowView继承自NSObject,RCTRootShadowView继承自RCTShadowView.。
让我们来梳理下他们的作用。
RCTRootView&RCTRootContentView RCTRootView作为一个根视图,是一个ReactNative应用(模块)的入口。上篇文章《一篇文章详解React Native初始化和通信机制》 中说过,JSbundle加载完成后发送一个RCTJavaScriptDidLoadNotification通知给RCTRootView。RCTRootView收到通知后创建了RCTRootContentView并作为 subview 添加到RCTRootView上,同时调用了runApplication方法。
RCTRootView#runApplication:方法以_moduleName、_contentView.reactTag以及_appProperties为参数调用 JS 模块AppRegistry的runApplication方法。
上面说过,RN root components 都需要通过AppRegistry模块的registerComponent方法进行注册。
RCTShadowView&RCTShadowRootView 在 ReactNative中,每个 UI 组件(view)实例都对应一个RCTShadowView(或其派生类)实例,从上面类图可知,虽然其命名以View结尾,但实质并非 View,而是继承自NSObject。其主要功能是通过facebook-Yoga 在子线程(shadow thread)进行布局相关的计算。所以RCTShadowView主要接管了UI视图的布局计算工作。就像UIView接管了CALayer的事件处理工作一样。RCTShadowRootView顾名思义,专门负责RCTRootView的布局计算。
渲染过程
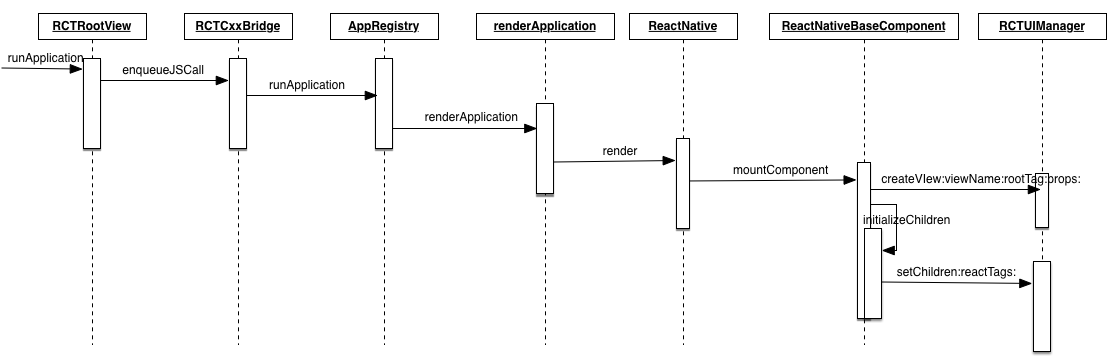
前文已提到,RCTUIManager#createView:viewName:rootTag:props:只是创建了目标 view 并添加到_viewRegistry中(仅此而以)。
从上图可以看到,JS 中的ReactNativeBaseComponent模块在调用RCTUIManager的createView:viewName:rootTag:props:方法创建目标 view 之后,还会调用RCTUIManager的setChildren:reactTags:方法:
1
2
3
4
5
6
7
8
9
10
11
12
13
14
15
16
17
18
19
20
21
22
23
24
25
26
27
28
29
30
// RCTUIManager.m RCT_EXPORT_METHOD(setChildren:(nonnull NSNumber *)containerTag reactTags:(NSArray<NSNumber *> *)reactTags) { RCTSetChildren(containerTag, reactTags, (NSDictionary<NSNumber *, id<RCTComponent>> *)_shadowViewRegistry); [self addUIBlock:^(__unused RCTUIManager *uiManager, NSDictionary<NSNumber *, UIView *> *viewRegistry){ RCTSetChildren(containerTag, reactTags, (NSDictionary<NSNumber *, id<RCTComponent>> *)viewRegistry); }]; [self _shadowViewDidReceiveUpdatedChildren:_shadowViewRegistry[containerTag]]; } static void RCTSetChildren(NSNumber *containerTag, NSArray<NSNumber *> *reactTags, NSDictionary<NSNumber *, id<RCTComponent>> *registry) { id<RCTComponent> container = registry[containerTag]; NSInteger index = 0; for (NSNumber *reactTag in reactTags) { id<RCTComponent> view = registry[reactTag]; if (view) { [container insertReactSubview:view atIndex:index++]; } } }
如上图源码所示,setChildren:reactTags:分别针对_shadowViewRegistry以及_viewRegistry(在 UIBlock 中完成调用)调用了静态方法:RCTSetChildren。
对于shadowView,最终会调用到RCTShadowView#insertReactSubview:atIndex:方法:
1
2
3
4
5
6
7
8
9
10
11
// RCTShadowView.m - (void)insertReactSubview:(RCTShadowView *)subview atIndex:(NSInteger)atIndex { RCTAssert(self.canHaveSubviews, @"Attempt to insert subview inside leaf view."); [_reactSubviews insertObject:subview atIndex:atIndex]; if (![self isYogaLeafNode]) { YGNodeInsertChild(_yogaNode, subview.yogaNode, (uint32_t)atIndex); } subview->_superview = self; }
在该方法中,做的最核心的事情莫过于在YGNode树中插入相应的子节点。
对于view,最终会调用到UIView+Rect的insertReactSubview:atIndex:方法:
1
2
3
4
5
6
7
8
9
10
11
12
// UIView+React.m - (void)insertReactSubview:(UIView *)subview atIndex:(NSInteger)atIndex { // We access the associated object directly here in case someone overrides // the `reactSubviews` getter method and returns an immutable array. NSMutableArray *subviews = objc_getAssociatedObject(self, @selector(reactSubviews)); if (!subviews) { subviews = [NSMutableArray new]; objc_setAssociatedObject(self, @selector(reactSubviews), subviews, OBJC_ASSOCIATION_RETAIN_NONATOMIC); } [subviews insertObject:subview atIndex:atIndex]; }
在该方法中,按照层级顺序(index)将subView 添加到AssociatedObject reactSubviews中,还是没有真正添加到视图层级树中!
Flush UI Block 上篇文章《一篇文章详解React Native初始化和通信机制》 中说过,为了避免JS to Native的频繁调用,所有的JS to Native的调用都不会立即执行,而是放到一个队列中等待Native调用。而UI操作都是先添加到UIManager->_pendingUIBlocks队列中。React Native执完一次批处理后会触发Native侧Executor的callNativeModule的调用(JS线程)。然后经由RCTCxxBridge调用到RCTUIManager的flushUIBlocksWithCompletion:(shadowQueue)。最后在flushUIBlocksWithCompletion:方法中会切换到主线程更新视图的属性。
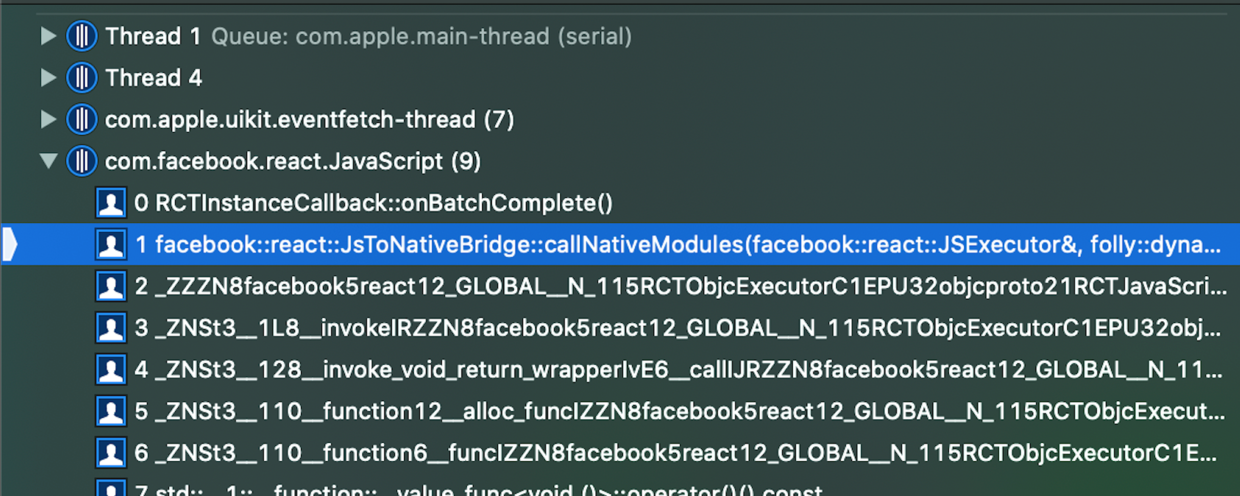
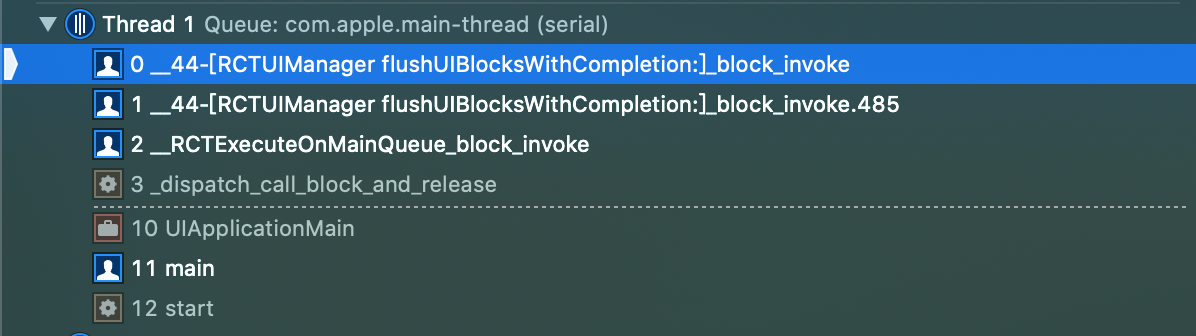
下面三张堆栈图完美的展现了触发UI的更新的顺序:
显示native侧收到JS侧的调用,这个调用最先是RCTObjcExecutor(dev环境)收到的,然后经由JSToNativeBridge转发给RCTInstanceCallback。这些操作都是在JS线程执行的。
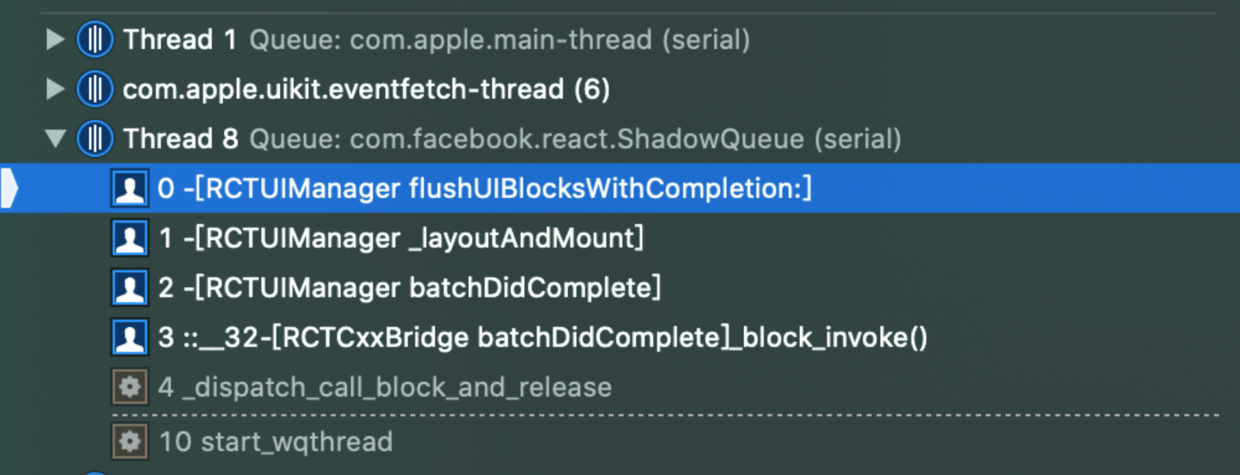
RCTInstanceCallback通过成员变量bridge_将调用转发给RCTCxxBridge,然后转发给RCTUIManger。这些操作都是在shadowQueue中执行的。
最后flushUIBlocksWithCompletion:中切换到主线程挨个执行_pendingUIBlocks中的block。
参考文章 https://zxfcumtcs.github.io/2018/02/03/RNRendering/
https://zhuanlan.zhihu.com/p/32749940